Cost Impact — Overview
Live rough-order-of-magnitude cost estimates as you mark up PDFs and 3D issues: first-time setup (calibrate scale), how it works, and the core budgeting workflows.
Cost Impact — Overview
The Cost Impact toolbar provides live rough-order-of-magnitude cost estimates as you create markups on PDFs or issues in the 3D viewer. It is designed for early-stage budgeting and design-option comparison — not for final contract pricing.
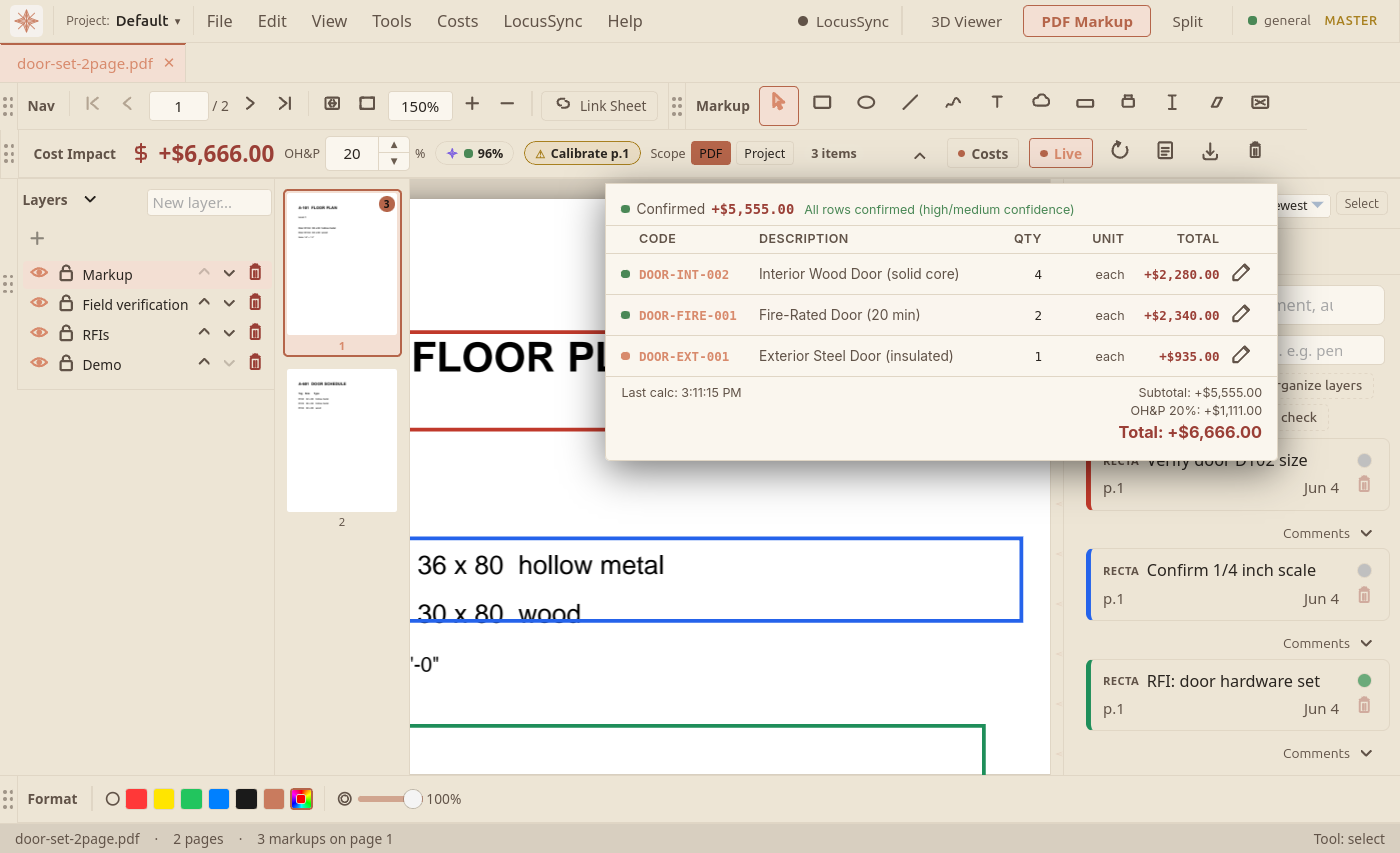
Figure 1 shows the toolbar with its breakdown panel open. The toolbar carries the running total, an overhead-and-profit percentage, an aggregate confidence reading, and the item count; the breakdown panel itemizes each line by code, description, quantity, unit, and total, then rolls them up into a subtotal, the OH&P amount, and the grand total.
- Open the PDF and switch to the Measure → Calibrate tool. Click two points on a known dimension (a printed scale bar, a wall labeled in feet, etc.), then enter the real-world length and unit. Repeat on every page that has cost-eligible markups — calibration is per-page, not per-document.Without calibration, every cost-eligible draw produces a quantity of 0 and silently skips the calc. You'll see a one-time toast prompting you to calibrate, but it's much easier to do it up front.
- Open the Cost Impact toolbar (the toolbar shows
Cost Impact: $0.00until rows exist). Click the region selector and pick your project's city — the engine multiplies base unit costs by the region factor (1.0 for Toronto, ~1.15 for Vancouver, etc.).Region factor only affects future calc + Recalculate. Existing rows can be reapplied via the toolbar's Recalculate button. - Start drawing cost-eligible markups (Rectangle, Polygon, Material Hatch, Measure Area / Polylength, etc.). The Cost Impact total ticks up live as you draw. Open the breakdown panel (chevron next to the total) to see per-markup item codes + confidence dots.Drawing a single-point linear measure, a calibration marker, a text annotation, or a stamp won't trigger costs — those are annotations, not material. See the eligibility table below.
- For each markup that auto-resolved to
MISC-001or a clearly wrong code, right-click → Set Element Type and pick the correct category from the picker. Cost row updates immediately with the new code.
How It Works
Every time you draw a markup or create an issue, LocusBIM automatically:
- Scans the issue or markup description for scope keywords (demo, replace, repair, install, paint)
- Matches the linked BIM element's IFC type or Revit category to the best cost code in the library
- Falls back to markup tool type when no element is linked
- Generates composite rows for multi-scope work (e.g., "replace drywall" → demo + install + paint)
- Multiplies quantity × unit cost × city region factor
- Cost Impact — What triggers costsWhich markup tools produce cost rows, why a calculation looks wrong or missing, smart scope detection, and the best-practice workflow for accurate estimates.
- Cost Impact — Element types & mappingHow markups map to CSI cost codes: IFC type mapping for 3D, mapping your own Revit categories, and setting element type on generic PDFs.
- Cost Impact — AI-assisted costingKhatam in the cost engine: the confidence indicator, manual override, intelligent takeoff from symbols and hatches, the MEP keyword hint, and the AI verbiage helper.
- Cost Impact — Configuration & referenceCost Impact configuration: toolbar controls, region factor (city multipliers), imperial vs metric units, custom cost items, CSV import/export, and the legal disclaimer.
- Measurement & CalibrationCalibrate drawing scale and run linear, area, radius, diameter, angle, polylength, and count measurements on PDFs.